


You inherited a HubSpot portal that's been sending marketing email for years. Nobody can tell you whether the sending domain was ever connected, whether DMARC exists, or why the From address on last month's newsletter showed something like hs-123456.hubspotemail.net to some recipients. Then Gmail starts junking your sends, and the first question everyone asks is "is our authentication set up?"
It's a fair question. Since 2024, Google and Yahoo have required SPF, DKIM and DMARC from bulk senders, and Microsoft began enforcing authentication for high-volume senders to Outlook.com in 2025. Mail that fails doesn't just land in spam. It can be rejected outright.
The good news: in HubSpot this is a one-time job, usually an hour's work plus waiting for DNS. This checklist covers exactly what to set up, the mistakes that break it, and how to confirm it's working. It's Lever 1 of the HubSpot email deliverability checklist, and the lever to fix first.
What SPF, DKIM and DMARC each do in HubSpot
All three answer the same question for Gmail and Outlook: did this email really come from who it says it came from? Each checks a different part of the answer.
|
Record |
What it proves |
What HubSpot gives you |
DNS record type |
|---|---|---|---|
|
SPF |
HubSpot's servers are allowed to send for your domain |
An |
TXT |
|
DKIM |
The email wasn't altered after it left HubSpot, and is signed for your domain |
Two records to add |
CNAME (×2) |
|
DMARC |
What receivers should do when SPF or DKIM fail, and where to send reports |
A suggested record |
TXT |
The one that matters most for your From address is DKIM. Until your domain is connected with DKIM, HubSpot won't send marketing email with your domain in the From address. It rewrites the sender to a HubSpot-managed domain instead, which is why some recipients see an unfamiliar address.
DMARC is the one most often missing. HubSpot's connection flow now asks for it, but many portals connected their sending domain years ago, when SPF and DKIM were all that was needed. Those portals often show a domain that looks connected but isn't fully authenticated.
The setup checklist
You'll need two things before you start: access to HubSpot's domain settings, and a login for wherever your DNS is managed (your registrar, Cloudflare, or your IT team). If DNS belongs to IT, send them this section.
1. Choose your sending domain
HubSpot only lets you authenticate a sending domain that isn't being used for something else, such as hosting your website. In practice that means a subdomain like info.yourcompany.com or mail.yourcompany.com. The subdomain should match the domain in the From address you send marketing emails from.
A subdomain also keeps your marketing email's reputation a step apart from the domain your team uses for one-to-one email. If a campaign goes badly, your sales reps' inboxes aren't caught in it.
2. Start the connection in HubSpot
- Click the settings icon, then go to Content > Domains & URLs.
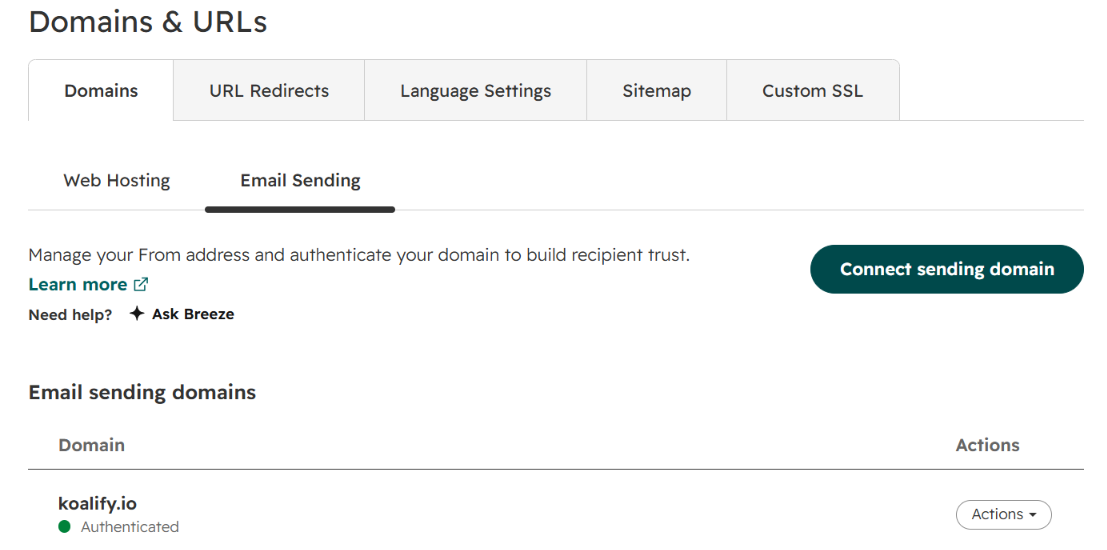
- Open the Email Sending tab and click Connect sending domain.
- Enter an email address you send marketing email from, click Next, and confirm the domain.
- If your DNS provider is supported, click Sign in with [provider] and HubSpot adds the records for you. Otherwise click No, I'll set it up manually.
3. Add the DNS records
HubSpot shows the records to add, with a Copy button for each. Paste them into your DNS provider exactly as shown: two CNAME records for DKIM, one TXT record for SPF and one TXT record for DMARC. HubSpot's current documentation also mentions an MX record as part of the connection; add whatever the setup screen lists for your domain.
If your DNS is on Cloudflare, turn off domain-wide CNAME flattening and proxying for these records first. HubSpot asks for both to be off, because they can stop it verifying your records.
4. Merge SPF, don't duplicate it
This is the mistake that breaks the most setups. A domain can only have one SPF record. If you already have one, for Google Workspace or Microsoft 365 for example, don't create a second. Add HubSpot's include: value to the existing record instead, so it reads something like:
v=spf1 include:_spf.google.com include:123456.spf03.hubspotemail.net -all
Check that v=spf1 appears once at the start and -all (or ~all) once at the end. Two SPF records on the same domain means both fail.
The example uses a placeholder for HubSpot's value. Always copy your own from the setup screen, because it's specific to your account.
5. Publish DMARC at p=none first
If you don't have a DMARC record, start with a monitoring-only policy:
v=DMARC1; p=none; rua=mailto:dmarc-reports@yourcompany.com
p=none tells receivers to deliver mail even if it fails, and to send you reports. It protects nothing yet, but it shows you everything that's sending as your domain before you start enforcing anything. The next section explains why that matters.
If your root domain already has a DMARC record, a subdomain inherits it, and HubSpot will treat the subdomain as authenticated.
6. Verify in HubSpot
DNS changes usually take 10 to 70 minutes, occasionally up to 48 hours. Wait at least 20 minutes, then go back to Content > Domains & URLs > Email Sending. Your domain will show one of three statuses:
- Not authenticated: none of the records are verified yet.
- Partially authenticated: DKIM is verified, but SPF or DMARC isn't.
- Authenticated: all three are set up and verified. This is the one you want.
If something's wrong, click Continue setup to see which record HubSpot is still waiting for.
7. Send from your own domain
Check the From address on every marketing email and automated workflow email. It should use the domain you just authenticated. A marketing email sent "from" a gmail.com or outlook.com address fails DMARC no matter how well your own domain is set up.
What breaks DMARC: everything else that sends as you
HubSpot is rarely the only thing sending email from your domain. Once you tighten DMARC, anything that sends as you without its own authentication starts landing in spam or getting rejected. That's why you start at p=none and read the reports first.
The usual suspects in a B2B stack:
- Your team's own inboxes. Google Workspace or Microsoft 365. Sales emails your reps send from a connected inbox in HubSpot go out through these, not through HubSpot's servers, so they rely on this authentication, not HubSpot's.
- Your CRM sync and sales tools. Salesforce, Apollo, Outreach, or any sequencing tool that sends from your domain.
- Support and product email. Zendesk, Intercom, your product's own notification emails.
- Billing and scheduling. Stripe receipts, invoicing tools, Calendly confirmations.
Each of these needs its own SPF include or DKIM setup on your domain. Most have a settings page with the records to add.
Watch the SPF lookup limit while you're adding them. SPF allows ten DNS lookups, and each include: uses at least one. A stack with Google, HubSpot, Salesforce, Zendesk and a few more can pass ten quietly, and when it does, SPF fails for everything. If you're close, move some senders onto their own subdomain, or rely on DKIM for them.
When to tighten your DMARC policy
Leave p=none running for two to four weeks and read the aggregate reports. A DMARC reporting tool makes them readable; the raw reports are XML. Once every legitimate sender in the reports is passing SPF or DKIM, move up in stages:
p=quarantine: failing mail goes to spam.p=reject: failing mail is refused.
Google and Yahoo's bulk-sender rules are met at p=none, so there's no rush to enforce. Move up when the reports show you're ready, not before. Tightening to p=reject with an unauthenticated support desk still sending as you is how customers stop getting password resets.
How to check it's working
HubSpot's Authenticated status is the first check. Three more take five minutes and catch the problems HubSpot's status page won't show you.
Look up the records from outside. If HubSpot can't verify a record, check whether the rest of the internet can see it:
- SPF: run your sending domain through MX Toolbox's SPF check. The record should include HubSpot, and there should be only one SPF record.
- DKIM: use MX Toolbox's DKIM lookup with your sending domain and the selector
smtpapi. A record should come back. - DMARC: use dmarcian's DMARC checker. A record should exist, with the policy you intended.
Check a real email. Send a test marketing email to a Gmail address, open it, and choose Show original from the menu. You'll see SPF: PASS, DKIM: PASS and DMARC: PASS at the top. Anything else tells you exactly which one to fix.
Watch Google Postmaster Tools. Once your domain is verified there, the authentication dashboard shows what share of your Gmail traffic passes SPF, DKIM and DMARC. It should sit close to 100%.
Authentication gets you accepted. Your list keeps you in the inbox.
With all three records passing, Gmail and Outlook know your email is really from you. What they decide next depends on how people react to it, and on who you're sending to.
That's the part authentication can't fix. A fully authenticated domain that keeps emailing dead addresses, spam traps and contacts who never open still loses its reputation. It just loses it under its own name, now that every email is verifiably yours. Authentication makes your reputation portable and accountable; it doesn't make it good.
So once this checklist is done, the next lever is list quality, and it's the one that degrades on its own. Contacts change jobs, forms collect typos, and enrichment tools add guessed addresses every week.
Koalify's email validation handles that lever inside HubSpot. A workflow action checks your existing contacts in one pass, then validates every new contact as it's created, writing the result to a native HubSpot property you can suppress on. Teams running it have kept sends to a 0.4% bounce rate across 4,000+ emails. It doesn't touch DNS or authentication; this checklist is yours. But it stops the reputation you've just protected from being worn down by the addresses you send to.
Frequently asked questions
How do I set up DMARC for HubSpot? Connect your sending domain in Settings > Content > Domains & URLs > Email Sending, and add the DMARC TXT record HubSpot gives you at your DNS provider. If you don't have a DMARC policy yet, start at p=none with a reporting address, then tighten to quarantine and reject once the reports show every legitimate sender passing.
How do I add HubSpot to my existing SPF record? Don't create a second SPF record. Add HubSpot's include: value from the setup screen into your existing record, and make sure v=spf1 appears once at the start and the all mechanism once at the end. Two SPF records on one domain cause both to fail.
Why does HubSpot say my domain is partially authenticated? DKIM is verified, but SPF or DMARC isn't yet. Wait at least 20 minutes after adding records, as DNS can take up to 48 hours. If it stays partial, click Continue setup to see which record is missing, and check for a duplicate SPF record.
Do I need SPF, DKIM and DMARC to send email from HubSpot? HubSpot will still send without them, but not with your domain in the From address: without DKIM, it rewrites the sender to a HubSpot-managed domain. And Google and Yahoo require all three from bulk senders, so in practice, yes.
Can I use my main website domain as my HubSpot sending domain? HubSpot only authenticates a sending domain that isn't used for something else, like hosting your website. Most teams use a subdomain such as info.yourcompany.com, which also keeps marketing email's reputation separate from your team's day-to-day inboxes.
Does a subdomain need its own DMARC record? Not necessarily. A subdomain inherits the DMARC record from its root domain, and HubSpot treats it as authenticated when the root has one.
Conclusion
Authentication is the one deliverability job you can actually finish. Connect a sending subdomain, merge SPF instead of duplicating it, publish DMARC at p=none, and don't move past it until the reports show every sender passing. Then check a real email and see three passes.
After that, the work moves to the addresses you're sending to. If you'd like to see how many of them would bounce on your next send, you can check them without leaving HubSpot.